ESS metadata handler user guide
- 1. Introduction
- 2. Login
- 3. Create a reference metadata file - New
- 4. Managing reference metadata file
- 5. Reference metadata file – Eurostat users
- 6. Specificities regarding roles
For service support, please contact: |
| Last reviewed: 24-10-2025 |
| ESSMH web portal |
1. Introduction
The purpose of this document is to provide a short but complete overview of the ESS-MH web application from a user perspective.
Users are authenticated by their username and password (EU Login). Based on this personal information as well as domain/s of interest/s and duties, authorisation takes place and a role is assigned. There are multiple roles defined in the ESS-MH application[1]:
- Publisher (Eurostat): the user has full access to all domains for all metadata providers.
- Validator (Eurostat): the user has full access to metadata flows belonging to his/her designated statistical domain.
- Super provider (ESS): the user has access to all domains and metadata flows across the different institutions placed in his/her country. In other words, access is country-based and not institution-based.
- Provider (ESS): the user is an end-user of an NSI (or any other national metadata provider), and has access to the metadata flow/s pertaining to his/her specific domain.
Further information on how to request access to ESS-MH can be found at Access requests.
Metadata files’ workflow
The web application follows the rationale shown in Figure 1, covering all the steps included in the life-cycle of a reference metadata file. The process begins with the collection of metadata information which can be done in various ways such as creating a new file, importing an external final into the system as well as copying or updating an existing file. The status of such file will be Draft and together with Ready for Validation and Ready for Publication they represent all intermediary stages. The Validated status will be the end point for metadata files which are not to be disseminated. Otherwise, it will be another intermediary stage before a file reaches Published status.
Metadata files can also navigate backwards upon the request of the user [2]. Super / Providers can send back to Draft status any metadata file that they have access, independently of its current status. Validators can also perform this action but have the possibility to send it to Ready for Validation in addition to Draft status.
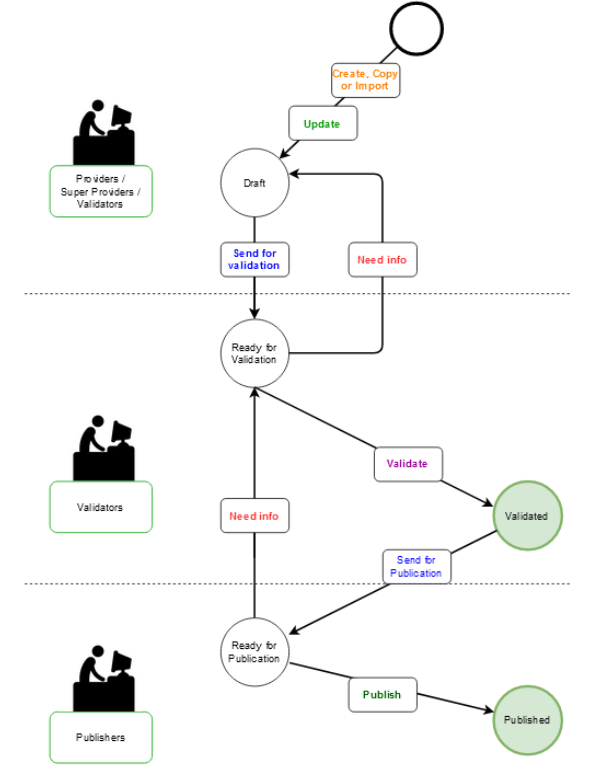
Figure 1: Metadata file’s workflow
2. Login
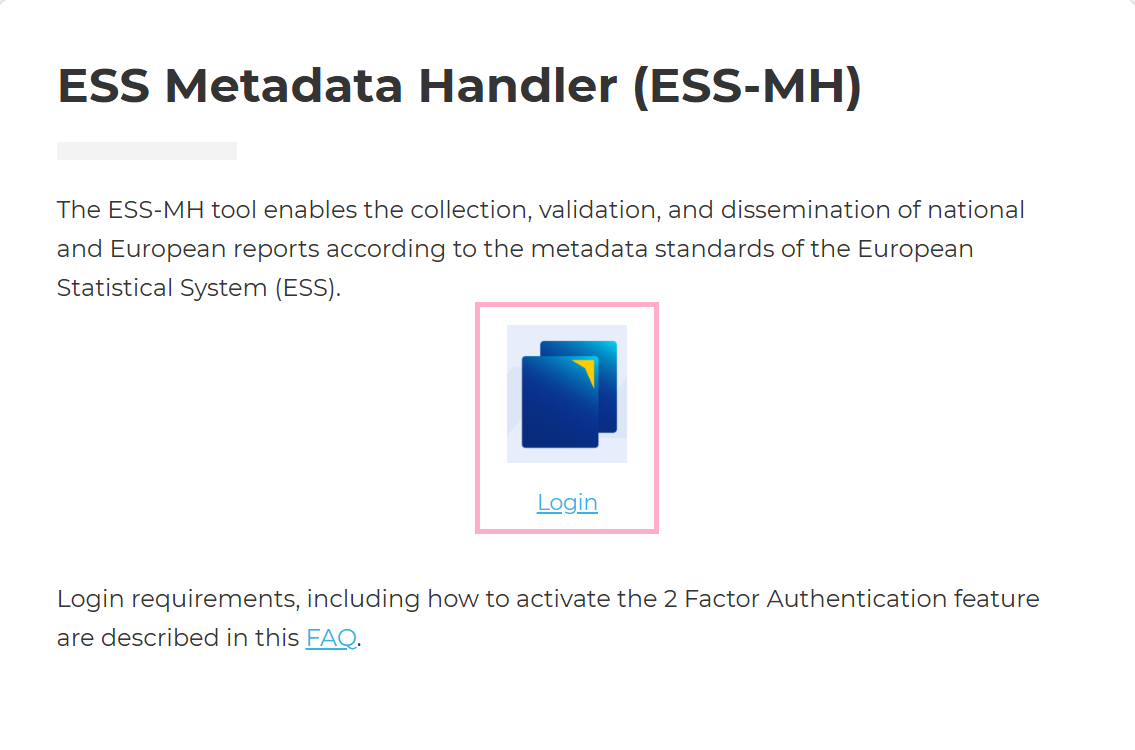
Figure 2: Login page
ESS MH users can access the web based tool by clicking on the Login button. Users will automatically be directed to the EU Login page in order to identify themselves. Please note that you will have to provide your email address and password. Other actions such as Create an account are available too.
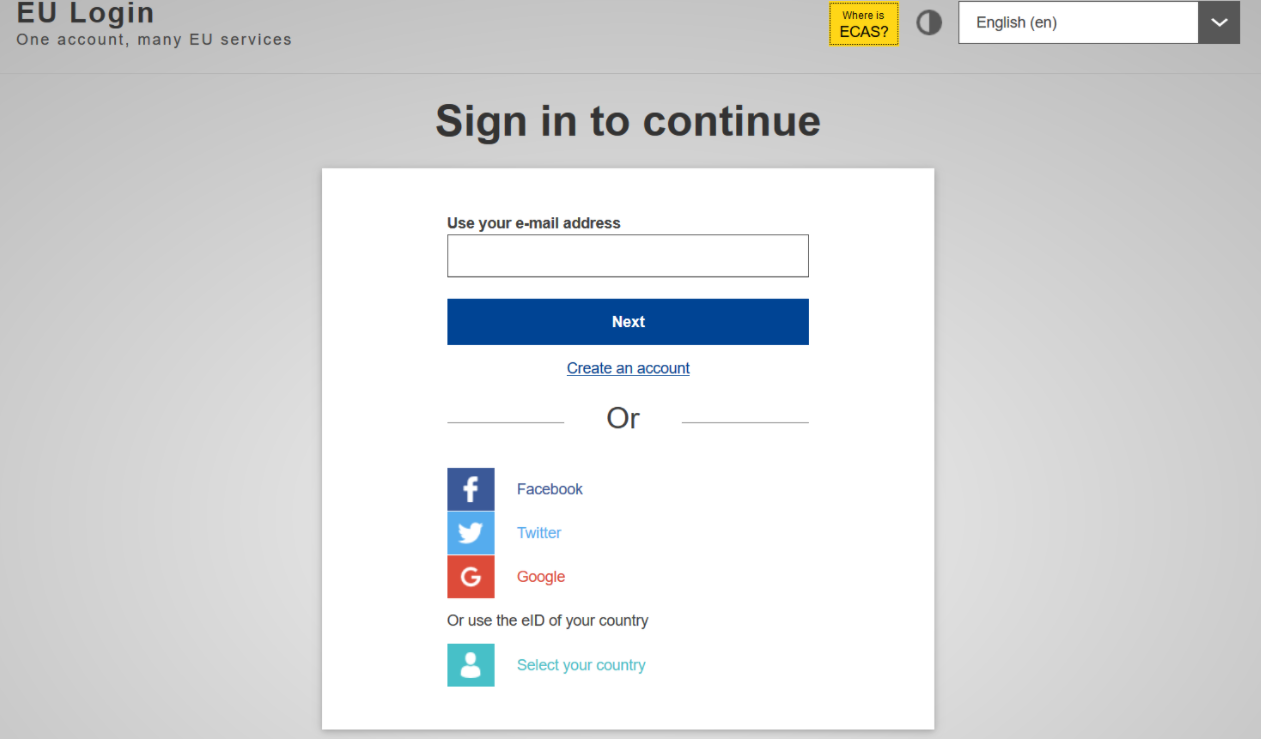
Figure 3: EU login page
Upon successfully logging in to the web application, the user will be redirected to the home page of the IT application[3].
3. Create a reference metadata file - New
The user can create a file by either clicking the Add button or selecting New, located on the drop-down menu of the Metadata files’ tab. Please note that other options such as Copy or Import an existing metadata files may be used in order to initiate the workflow.
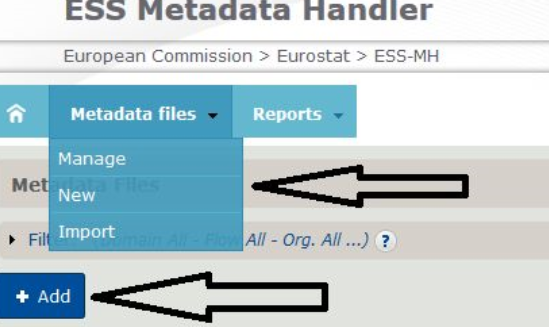
Figure 4: New / Add metadata file
3.1 Step 1 — Info
The first page of the wizard is displayed. The user will have to fill in the information as required bearing in mind that those categories marked with a red asterisk are mandatory. Once the information is completed the user should click Next.
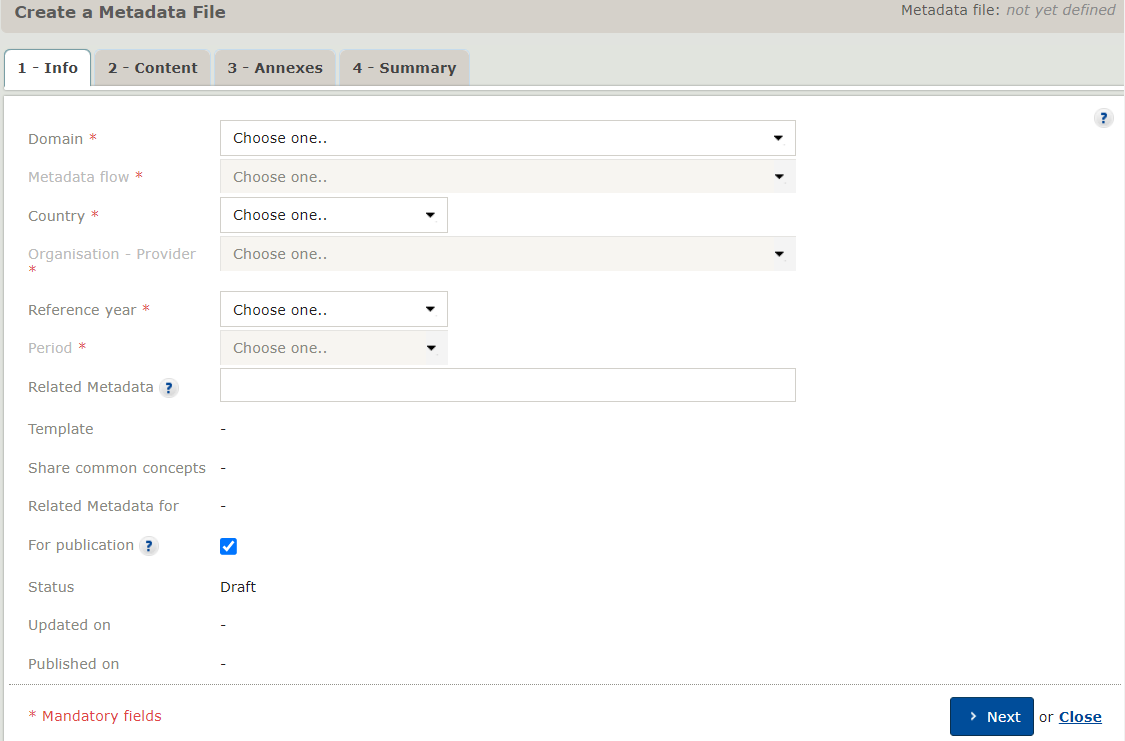
Figure 5: Creating a metadata file – Info
The user can return to Step 1 of the wizard by pressing the Back button or by selecting tab Info. If the Close button is pushed without saving the information, the information inserted until then will be lost and the user will be redirected to the homepage.
3.2 Step 2 — Content
In Step 2 of the wizard, the Metadata file name will automatically be generated based on the information provided in the previous step.
The user must also fill in all the mandatory fields needed to complete the metadata file. Mandatory fields are marked with a red asterisk in the tree structure. Different functionalities are available such as the Expand all button, which enlarges the (sub) concept’s list.
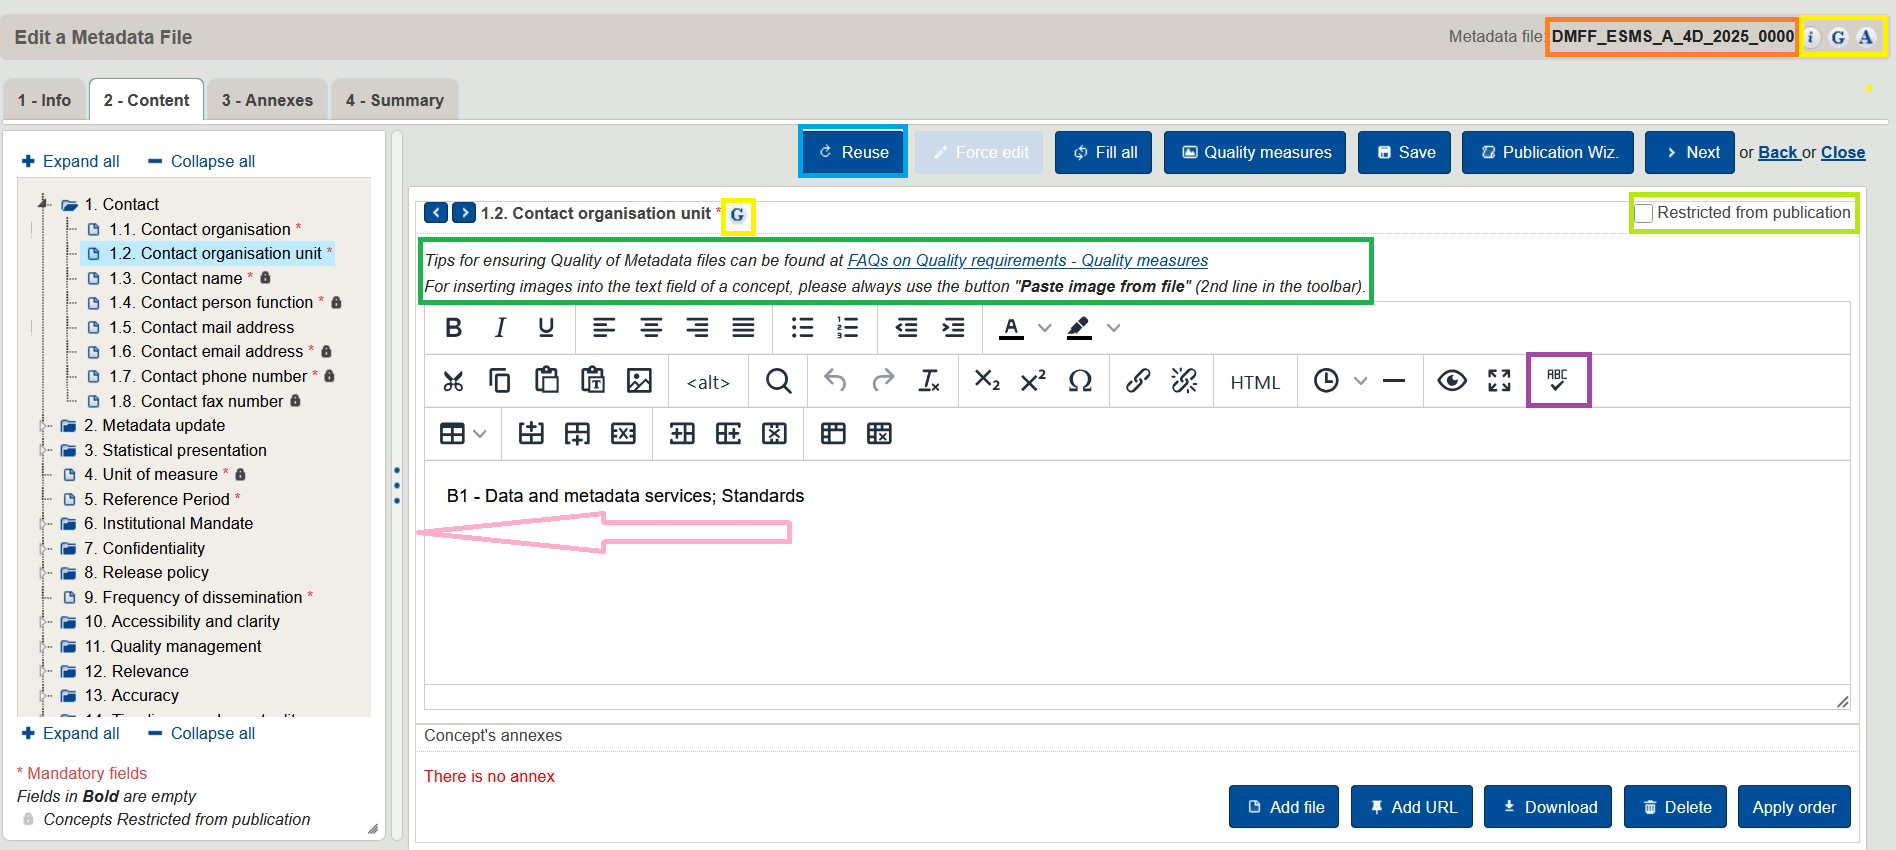
Figure 6: Creating a metadata File – Content I
Each (sub) concept is linked to a harmonised definition which may be complemented by some additional information (guideline). (Sub) concepts' definitions and guidelines can be accessed ![]() icon. Once an editable (sub) concept is selected by the user from the tree structure, there are two ways to enter data in the text-box[4]:
icon. Once an editable (sub) concept is selected by the user from the tree structure, there are two ways to enter data in the text-box[4]:
- Enter data directly in the text box (not copied from another application).
- Paste text from another application such as MS Word (Ctrl+V)
In order to ensure accuracy, clarity, completeness, and accessibility, ultimately improving the content of the metadata files we recommend the use of the quality checklist and the accessibility guidelines ![]() . By diligently following the checklist and guidelines during the pre-publication phase, users can identify and rectify errors, resulting in reliable and easily understandable information for end-users. The comprehensive checklist covers aspects like quality measures, layout, comprehensibility, completeness, clarity, language, images, and accessibility, guaranteeing that metadata files meet necessary standards for publication.
. By diligently following the checklist and guidelines during the pre-publication phase, users can identify and rectify errors, resulting in reliable and easily understandable information for end-users. The comprehensive checklist covers aspects like quality measures, layout, comprehensibility, completeness, clarity, language, images, and accessibility, guaranteeing that metadata files meet necessary standards for publication.
The Spell Checker ![]() button will help you identify words which may not be spelled correctly in English. For this feature to work, please make sure to enable English as the preferred language for spell check in your browser (e.g. In Google Chrome, please go to chrome://settings/languages).
button will help you identify words which may not be spelled correctly in English. For this feature to work, please make sure to enable English as the preferred language for spell check in your browser (e.g. In Google Chrome, please go to chrome://settings/languages).
The user can reuse the content of some or all concepts from existing metadata file/s by pressing the Reuse button. This action will trigger a pop-up window with a full list of all metadata files that the user has access to. A Filter option is available to help the user locate the appropriate information. After selecting the corresponding file/s the user will go on a second step and identify the (sub) concept/s which contain the information that will be reused, whether this be 'content only, Annexes only or 'Content and annexes'. In addition to selecting the type of information to be reused, the user will be able to decide whether to add it to the existing information (Append button) or delete the existing information and placing the selected one instead (Replace button).
The process will only be completed after clicking Apply. For more information on this feature please go to the Reuse FAQ.
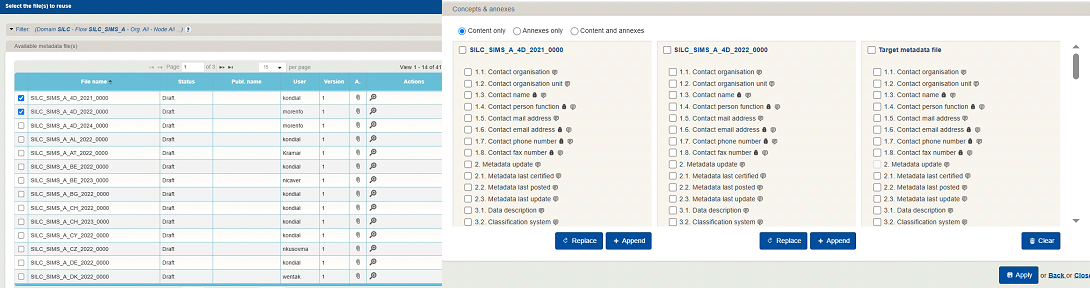
Figures 7: Steps 1 & 2 of the Reuse functionality
Users can decide whether an editable (sub) concept is publishable by ticking (or not) the appropriate box (restricted for publication). Additionally, Annexes can also be added to the new metadata file at the (sub) concept level by using the 'add file' and/or the 'add URL' button, depending on the format of the Annex. If the information to be attached is not related to one (sub)concept but to the whole new metadata file please proceed to the next tab of the wizard (step 3).
Finally, if the user does not fill in all the mandatory fields and tries to proceed to Summary (step 4), an error message is displayed indicating all the mandatory field(s) that still need(s) to be completed.
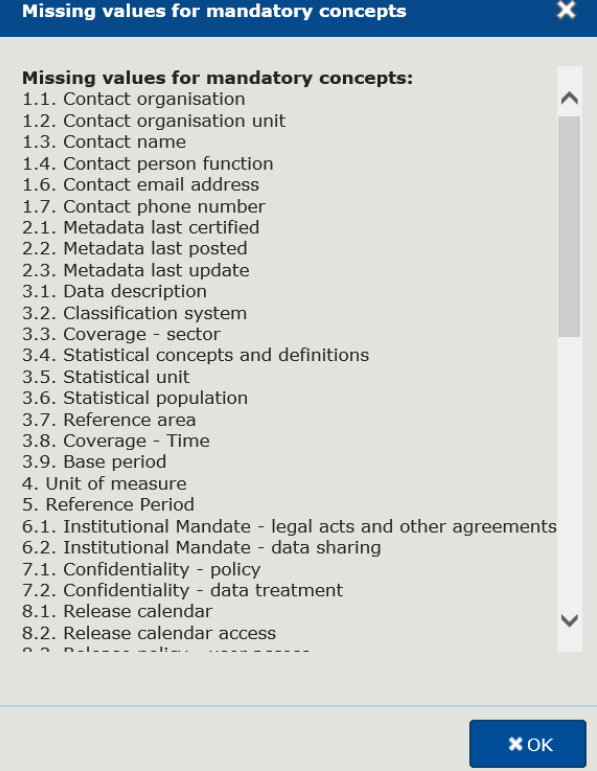
Figure 8: Missing mandatory information
3.3 Step 3 — Annexes
Annexes can be added to a metadata file on step 3 of the wizard. They can be uploaded to the system as a regular file and/or using a link to specific location by means of an URL address which will be placed at the bottom of the metadata file. The Annexes will be accompanied by a prefilled «Name suffix» based on the description provided.
Annexes can be sorted in ascending or descending mode, restricted for publication if needed (by selecting the 'Restr.' box) and changing the order by dragging and dropping them.

Figure 9: Creating a metadata file - Annexes
3.4 Step 4 — Summary
This is the last step of the wizard and so for the creation of the new metadata file. The user sees all the information that was filled in, under the sub-tab Full view. The information remains the same (except for five sub concepts comprised in Contact which are never published) under the Disseminated view sub-tab as long as the user has not activated the Restricted for publication functionality for any of the (sub) concepts (please see step 2). Otherwise, the locked (sub) concept(s) would be published replacing the content with a standard text (Restricted from publication).
The user will be able to view the information as it will appear once published. The Short metadata contains a subset of 15 concepts providing an enriching summary of the available metadata information. The user will also have the possibility to access all available metadata information by selecting the Full metadata option.
The user can also activate the lock for the entire new metadata file by not ticking the box For publication (please see Figure 10). In other words, this box has to be ticked in order to be eligible for publishing at a later stage.

Figure 10: Creating a metadata file -Summary
If the user attempts to close the wizard at any of the four steps without saving the file, a pop-up windows will alert him/her. If the action is pursued and the file is deleted, the information inserted up to this point will be erased from the system.
Finally, the user will save the newly created metadata file by pressing the Save button at the top and/or bottom of the page. The file is saved as Draft. Only when all the required information have been inserted and saved the Send button (for validation) will become available.

Figure 11: Sending a metadata file for validation
If the action was successfully completed the status of the metadata file would change from Draft to Ready for validation. Please note that an automatic notification will be triggered from EDAMIS4 regarding the transmission of the metadata file. More information about EDAMIS4 notifications alerts can be found at this FAQ.
In order to ensure the correct display of metadata information the Quality measures button is available. This functionality provides important information to metadata producers in relation to the formatting of information that was introduced up to this point. It should be noted that if invalid (not printable) characters are included, which may affect the display of information, this will be reflected in the message generated from the Quality measures. If the file does not contain any unwanted tags, the inserted metadata information should then be visible exactly the same by all parties regardless of the browser & other IT aspects that are involved.
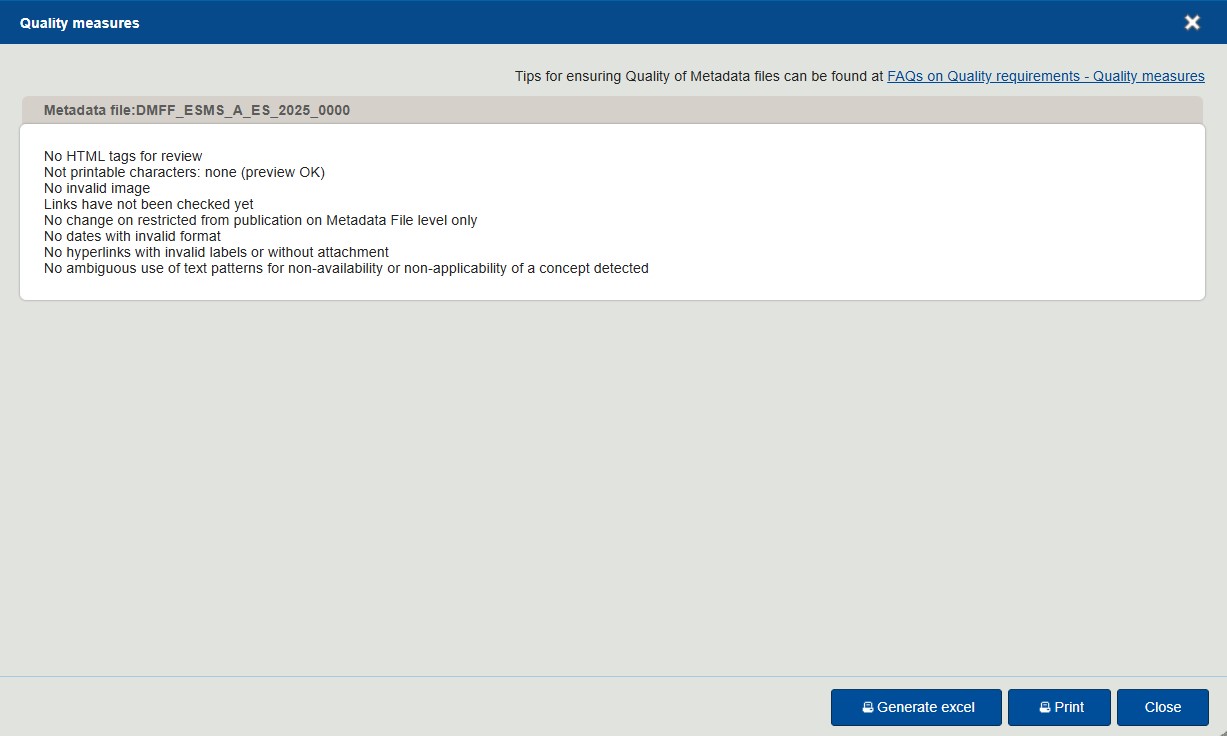
Figure 12: Quality measures box
4. Managing reference metadata file
On the metadata file showing list there is a column named Actions. The functionalities included within this column are largely dependent on the status of the metadata file and the role of the user. The following are the total number of Actions available within the ESS-MH application:
 Edit metadata file: Allows direct access to the content of the metadata file which can be edited;
 Publish metadata file: Initiates the three-step process that will lead to the publication of the metadata file;
 Copy metadata file: Allows copying the content of the an existing metadata file to a new file. It is especially useful when most or all information remains the same for another metadata file;
 Send for validation: Enables the sending of a metadata file as long as all compulsory information has been filled in;
 Recall: Reverts the metadata file back to Draft or Ready for validation status;
 Delete: A metadata file that is in Draft status can be erased by selecting this action. The deleted metadata file can be brought back to life if
  is actioned. To delete permanently please contact estat-data-metadata-services@ec.europa.eu;
 Download: Enables the download of the full set of available files i.e. annexes, images, MSD, DSDs if available, and the metadata file/s in html, sdmx.ml in SDMX formats 2.0 or 3.0 and xlsx format, respectively.
 View history: Access the legacy of the metadata file: retrieving comments, restoring and/or downloading previous version/s;
 Preview: The information that is comprised in a metadata file can be viewed here.
Thus, the functionalities or Actions available by status of the file are:
For Super/ Providers
| Draft |  |
| Ready for validation | |
| Ready for publication | |
| Validated | |
| Published |
For validators
| Draft | |
| Ready for validation | |
| Ready for publication | |
| Validated | |
| Published |
4.1 Global actions
Located under the metadata file showing list the system also contains a link to five (seven for Validators) key actions named as Global actions some of which are also available in the Action’s column (Download, Send for validation and Delete). However, through this set of actions, the user can Download, Send for validation, Delete, Compare, Restore, Copy a collection and Request for publication (the last two are only available to Validators) one or more metadata file(s) at once.
The Compare functionality allows users checking two metadata files against each other (or instances of the same metadata file by activating the View history function). The information that is not equal in both metadata files will be highlighted in red. A metadata file can also be compared against a previous version of the same file by clicking on the View history button and selecting the two versions of the file to be compared.
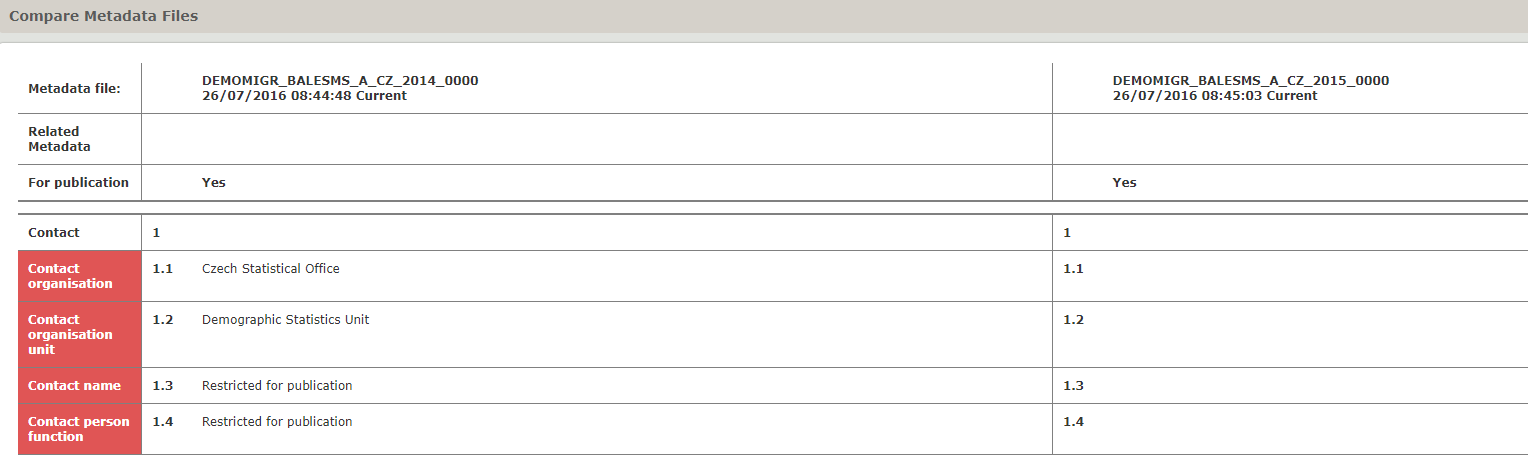
Figure 13: Metadata file – results of the compare global action
The Copy a collection functionality allows Validators who need to prepare a new metadata collection and for which an existing one can be used as a basis for it. The Validator will then click 'copy a collection' and then select the new target year (t+1/t+2) before confirming the impacted metadata files.
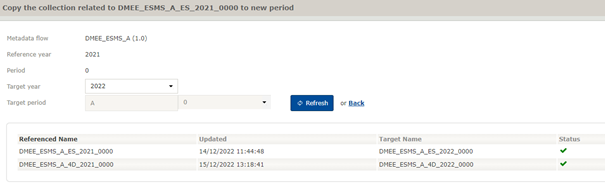
Figure 14: Copy a collection – Selection of metadata flow, reference year, target year and resulting files
The Request for publication feature allows validators to request multiple metadata files to be disseminated at once. Depending on the status of the metadata files, a success/error message may be displayed.

Figure 15: Request for publication
4.2 Filtering
On the Home page, the system provides the full list of metadata files available to the user. In order to help the user retrieve a specific file the Filter functionality is accessible (on the left side of the screen).
There are many parameters covered within the Filter function which can help us make a quick search. Thus a user can for example identify all the metadata files related to a specific year (for example 2022) by filling in the Reference year option from (2022) to (2022) and pressing on the Filter button. Please note that depending on the user’s role some of the filtering options will not be available.
The Filter function also allows users to save the selected filtering options for future use by hitting the Save filter button. Saved filters can be retrieved by using the Stored filter drop-down menu.
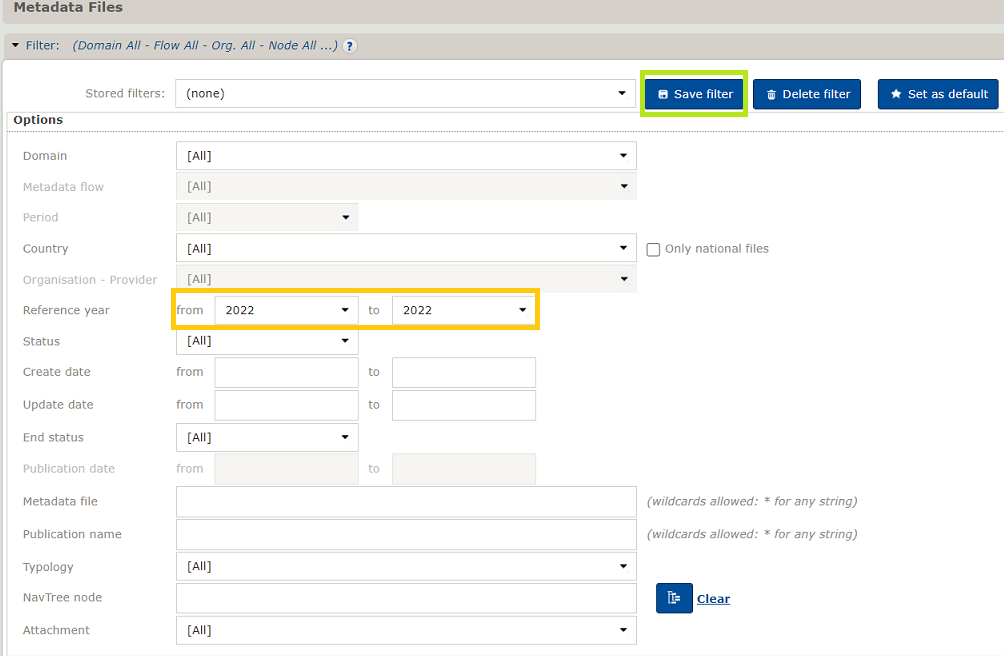
Figure 16: Filter function
4.3 Flexible report
This feature allows users to combine and put together metadata information that is available in different files into one called Flexible report. The feature is not intended to replace any of the established metadata report structures (e.g. SIMS, ESMS) but rather to support the analysis of (sub) Concepts across files, structures and/or time.
The list of (sub) Concepts available will vary depending on the metadataflows or typology chosen. When generating the flexible report based on metadataflows, any concept that appears in at least one of the metadataflows selected will be available in the list of (sub) Concepts. Please note that other options are also available to further select the content of the Flexible report.
Finally the user has to decide the Type of the report (list / table) and the Output format (PDF, HTML, Doc, Docx, Excel, on the screen or Excel with html tags, the last only available when 'Type' is 'Table') before he/she is able to create the Flexible report through Generate button. Also, the Download Annexes and Download Files buttons will enable the extraction of annexes and the full set of available files i.e. annexes, images, MSD, DSD if available, and the metadata file/s in html, sdmx.ml in format SDMX 2.0 and 3.0 and xlsx format, respectively.
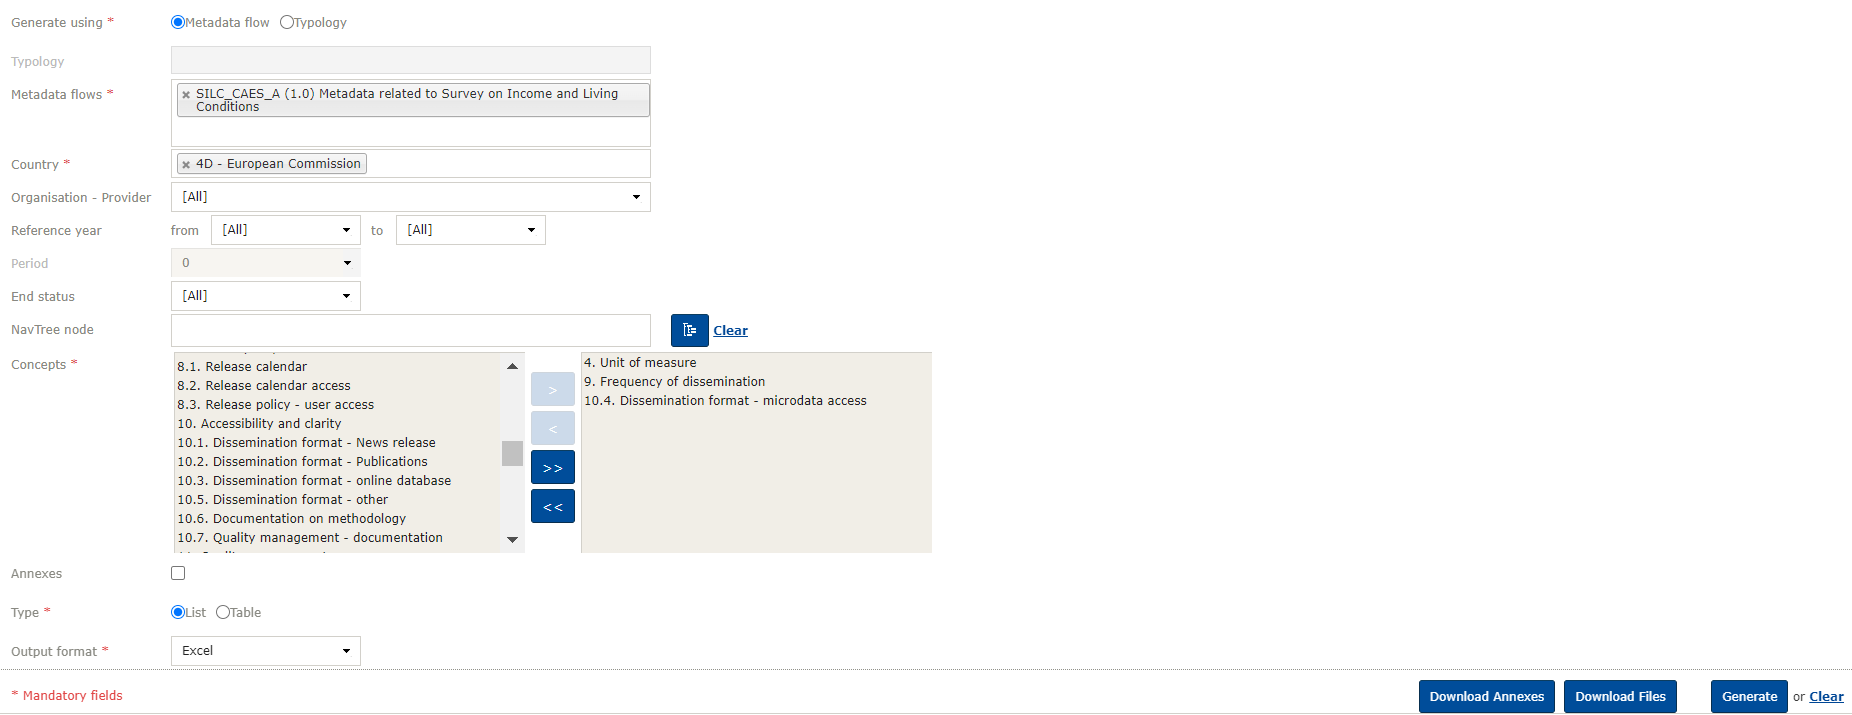
Figure 17: Generating a flexible report
4.4 Importing
The user may upload to the ESS-MH application an existing metadata file through the Import functionality which is placed under the Metadata files tab. One can import SDMX-ML and XLSX files. The user may as well use the information to be imported in order to overwrite an existing metadata file by ticking the appropriate box.
A detailed description of how to import SDMX-ML and/or XLSX files is available.
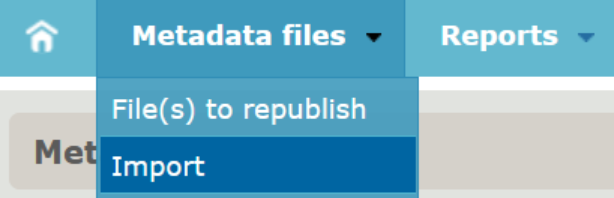
Figure 18: Import
Upon the successful importation of the file, the system will show an OK message with the name of the imported metadata file.
4.5 Notifications
It is important that the users of the application are kept informed on the progress made by the metadata files as well as when their input is needed. To that end, the ESSMH generates automatic messages when specific actions are taken, including those that do not require their contribution i.e. a metadata file that is deleted. The notifications are grouped in 5 categories (Profile update, Publication, Sending for validation, Validation and Delete/Restore), each covering two or more actions. Please see below the complete list of actions linked to these categories and the recipient of these notifications.
Super / Providers and Validators may go to My profile (by clicking on the user's name on the top-right), to view the alerts that are linked to their profile and unsubscribe to some if needed.
| Subscription / tied actions | Action | Status change (of Metadata files) | Addressee |
|---|---|---|---|
| Profile update | Profile update | any updates related to the user account (not related to the Role) | affected user |
| Profile update | when updates related to the Role are done (new role assigned, or e.g. Domain access updated) | affected user and Super Provider | |
| Publication (PUBLICATION) | Publish | Ready for publication > Published | Validators, Providers, Super Providers, Publication email saved on agency level |
| Unpublish | Published > Validated | Validators | |
| Recall (to Ready for publication) | Published > Ready for publication | Validators | |
| Sending for validation (SEND) | Send for validation | Draft > Ready for validation | Validators |
| Recall (to Draft status) | Ready for validation > Draft | Validators | |
| Validation (VALIDATION) | Need info (before validation) | Ready for validation > Draft | Providers, Super Providers |
| Validate | Ready for validation > Validated | Providers, Super Providers | |
| Need info (before publication) | Ready for publication > Ready for validation | Validators | |
| Recall (to Draft status) | Validated > Draft | Validators | |
| Recall (to Ready for validation) | Published > Ready for validation | Validators | |
| Recall (to Ready for validation) | Validated > Ready for validation | Validators | |
| Delete/Restore | Delete | Draft > Deleted | Providers, Super Providers |
| Delete | Ready for validation > Deleted | Validators | |
| Restore | Deleted > Draft | Providers, Super Providers |
5. Reference metadata file – Eurostat users
5.1 Validation & Need Info
The Eurostat user can either Validate or request further input (Need Info), a metadata file that is Ready for validation. The metadata file can also be reverted back to Draft status by either ESS or Eurostat users through the Recall functionality.
In order to review the information provided by the ESS user [5] the Eurostat user could enter the metadata file through the  icon –other actions such as Preview, Compare and Flexible reports are available too. If the Edit Metadata File was clicked the same wizard provided when creating the new metadata file will be available. The review process ends in step 4 when the Eurostat user decides to either Validate or request further information (Need info) about the metadata file. The two buttons are located at the top and bottom of the step 4 Summary page.
For improving the validation process and in order to ensure accuracy, clarity, completeness, and accessibility of the metadata files we recommend the use of the quality checklist and the accessibility guidelines. By diligently following the checklist and guidelines during the pre-publication phase, validators can identify and rectify errors, resulting in reliable and easily understandable information for end-users. The comprehensive checklist covers aspects like quality measures, layout, comprehensibility, completeness, clarity, language, images, and accessibility, guaranteeing that metadata files meet necessary standards for publication.
If the Eurostat user selects the Validate button the ESSMH will confirm that the metadata file has been validated. The Eurostat user could also request further information (Need info), reverting the metadata file back to Draft status. In both cases, the ESS MH will generate a text box where the Eurostat user will be able to comment on this action (This step is compulsory if the Eurostat user is not validating the metadata file). The ESSMH will then automatically notify ESS users from the same organisation on the new status of the metadata file, including the comments provided by the Eurostat user.
Eurostat users are able to edit a metadata file that they are reviewing without direct input from the ESS user. That is the status of the file remains in Ready for validation after the changes have been applied. In such scenario and in order to be transparent, the ESSMH will automatically integrate a explanatory message in the corresponding Validate / Need info tex box. The proposed wording can be modified or even deleted manually.

Figures 19: Automatic message
The metadata file version is displayed in several forms, including on the 'i' icon. All exchanged information will be accessible on the Metadata file history as well as previous versions of the metadata file which can be viewed, downloaded and / or restored (overwriting the content, annexes and images included in the current version).

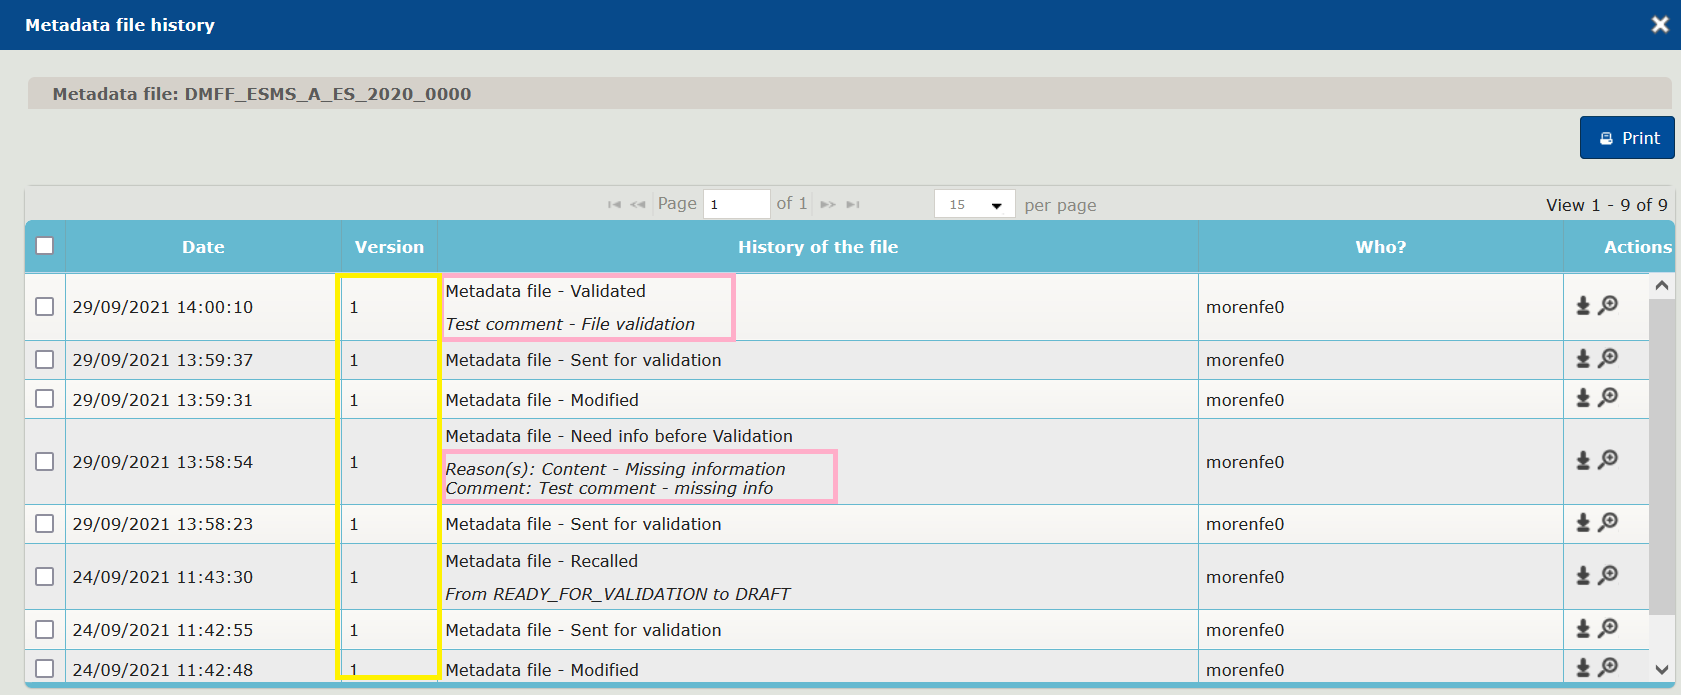
Figures 20: Version & Comments log
If the file is not intended for Publication (the box next to for publication is not ticked), the workflow of the file will end on Validated status, having the  icon next to the file name. For a metadata file that is to be disseminated, the Eurostat user will proceed and Request its publication.
5.2 Request for Publication
Once the file has been validated the system will allow the Eurostat user to trigger the Publish a metadata file action through the  icon. Please note that only metadata files which have not been locked will be enabled for publication (For publication box is activated).
5.2.1 Step 1 -Preview
The Request for publication process includes another wizard with 3 steps. Here it starts with Preview (step 1) which corresponds to last step (summary) of the new reference metadata file's wizard. There will be no differences between Full view and Disseminated view unless the lock was activated in one / several (sub) concepts.
The Eurostat user will click Next, located at the bottom of screen.
5.2.2 Step 2 –Attachment
In step 2 the Eurostat user will have to decide on:
- Publication title: Using either the same title as the node or creating a new one;
- Attach/link: Identifying the node that will be the recipient of the metadata file;
- Take from other (previous) period: It can reuse the attachment, links and publication information of an existing attached and published file. Please note that only one metadata file per organisation and per reference year can be attached at a time;
- Clear linked nodes: It can erase the links to existing nodes.
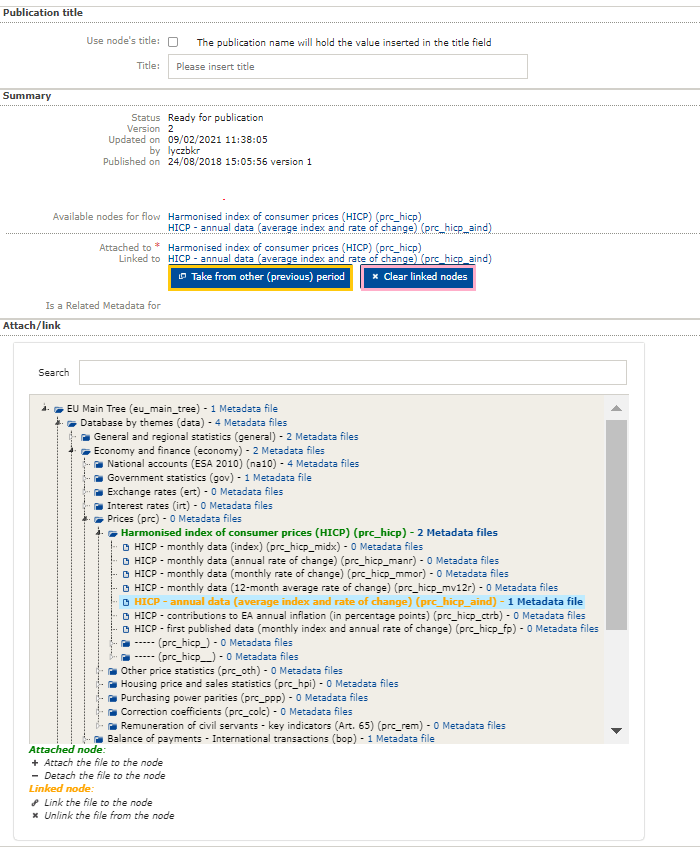
Figure 21: Request for publication – Step 2
The metadata file can only be Attached to one node whereas it can be Linked to as many as the Eurostat user appropriately decides so. In other words, the metadata file will be physically placed only on one node (folder, sub-folder or dataset) through the Attached node function. However the metadata file can be re-used by other nodes through the Linked node function.
When the Eurostat user has found the physical recipient to Attach the metadata file he/she will click on the '+' icon and the title will then be highlighted in green (to detach the file from a node, the Eurostat user will use '-' icon). The metadata file is Linked to a node(s) through the  icon, and the title will be highlighted in orange (to unlink the file from the node(s), the Eurostat user will click on the icon)[6].
5.2.3 Step 3 –Publication
In order to access the final step of the Publication wizard the Eurostat user is requested to attach the metadata file to a node on step 2 and click on Save. There is only one action covered in the final step: Request for publication.
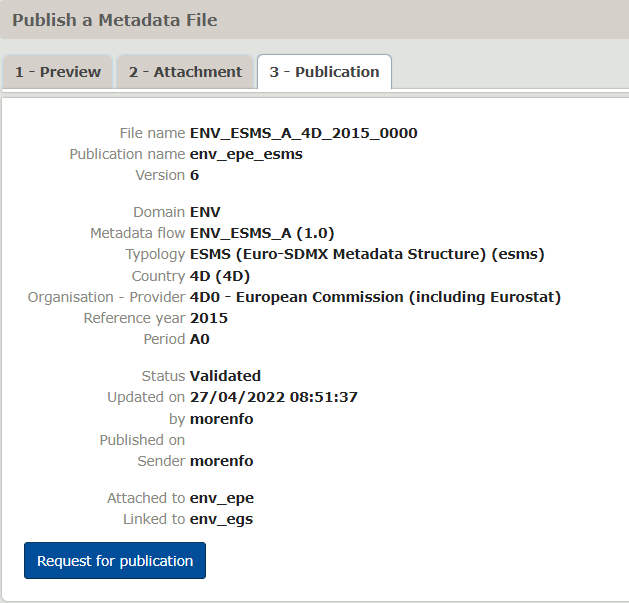
Figure 22: Request for publication – Step 4
If the action is successfully completed the system will confirm it and the status of the metadata file will change from Validated to Ready for publication.
Please be aware that the European metadata file will be automatically republished by the metadata team whenever a national metadata file has been published for the first time. The ESS MH tool will alert the Eurostat user if he/she attempts to request the publication of National file which is covered by a European one which is already published. A similar text will be provided when the Eurostat user enters the European file –see below
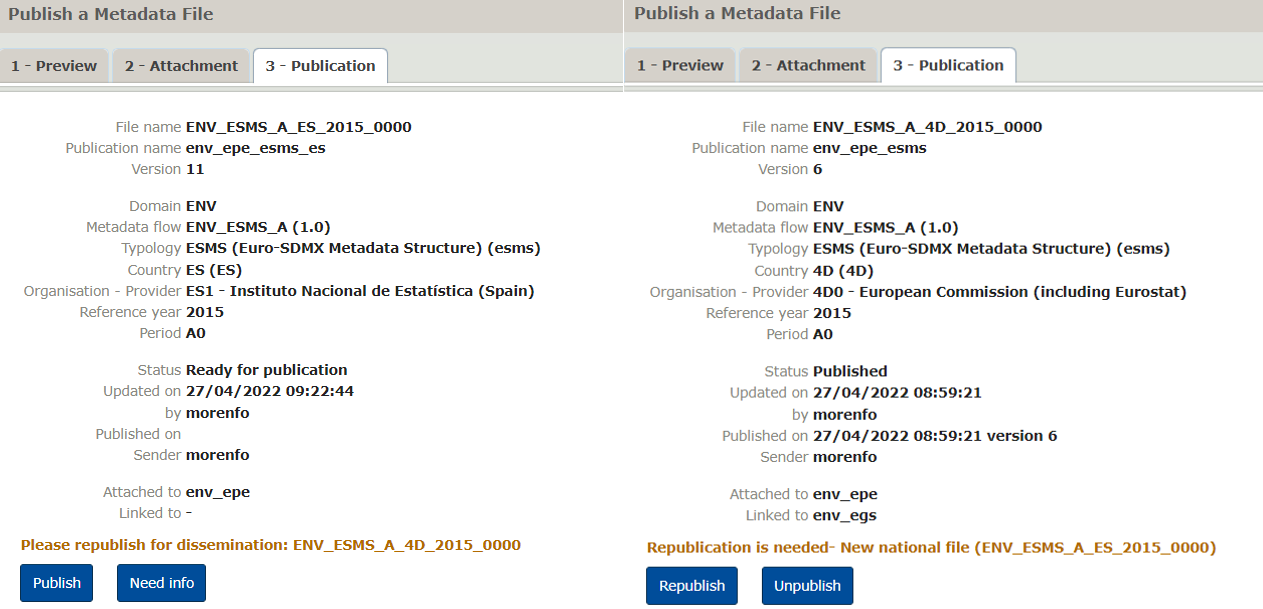
Figure 23: Automatic alert message: Republish EU file (from National and European files perspectives).
5.3 Publication
This action can only be performed by Publishers. It corresponds with the final step before the metadata file goes live on the Eurostat website.
In order to get started the Publisher will click on the  icon. The Publication wizard will then pop-up –being the same as the one used for the Request for Publication section. The Publisher will review all steps. Only one action is foreseen in the last step: Publish the metadata file[7]. The ESSMH will then automatically notify ESS users from the same organisation and Eurostat users on the new status of the metadata file, including the comments provided by the Eurostat user.
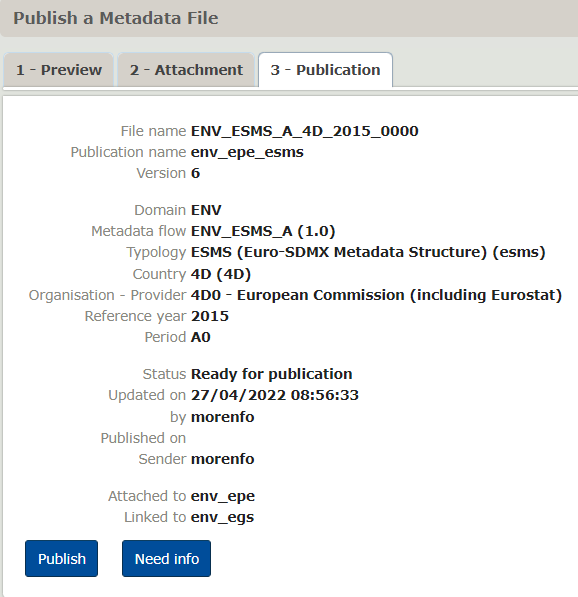
Figure 24: Publication's wizard– Publish
5.3.1 Published files
Relevant information about published files is to be found on the Tracking report, located under the Reports tab. The Metadata file - Published option has to be selected in the Action item in order to display the required information. Other filtering options such as Date (From / to) exist. This functionality is only available to Eurostat users. The list of all published metadata files will be available here, including information on the following items: Date, Object name and the name of the Publisher.
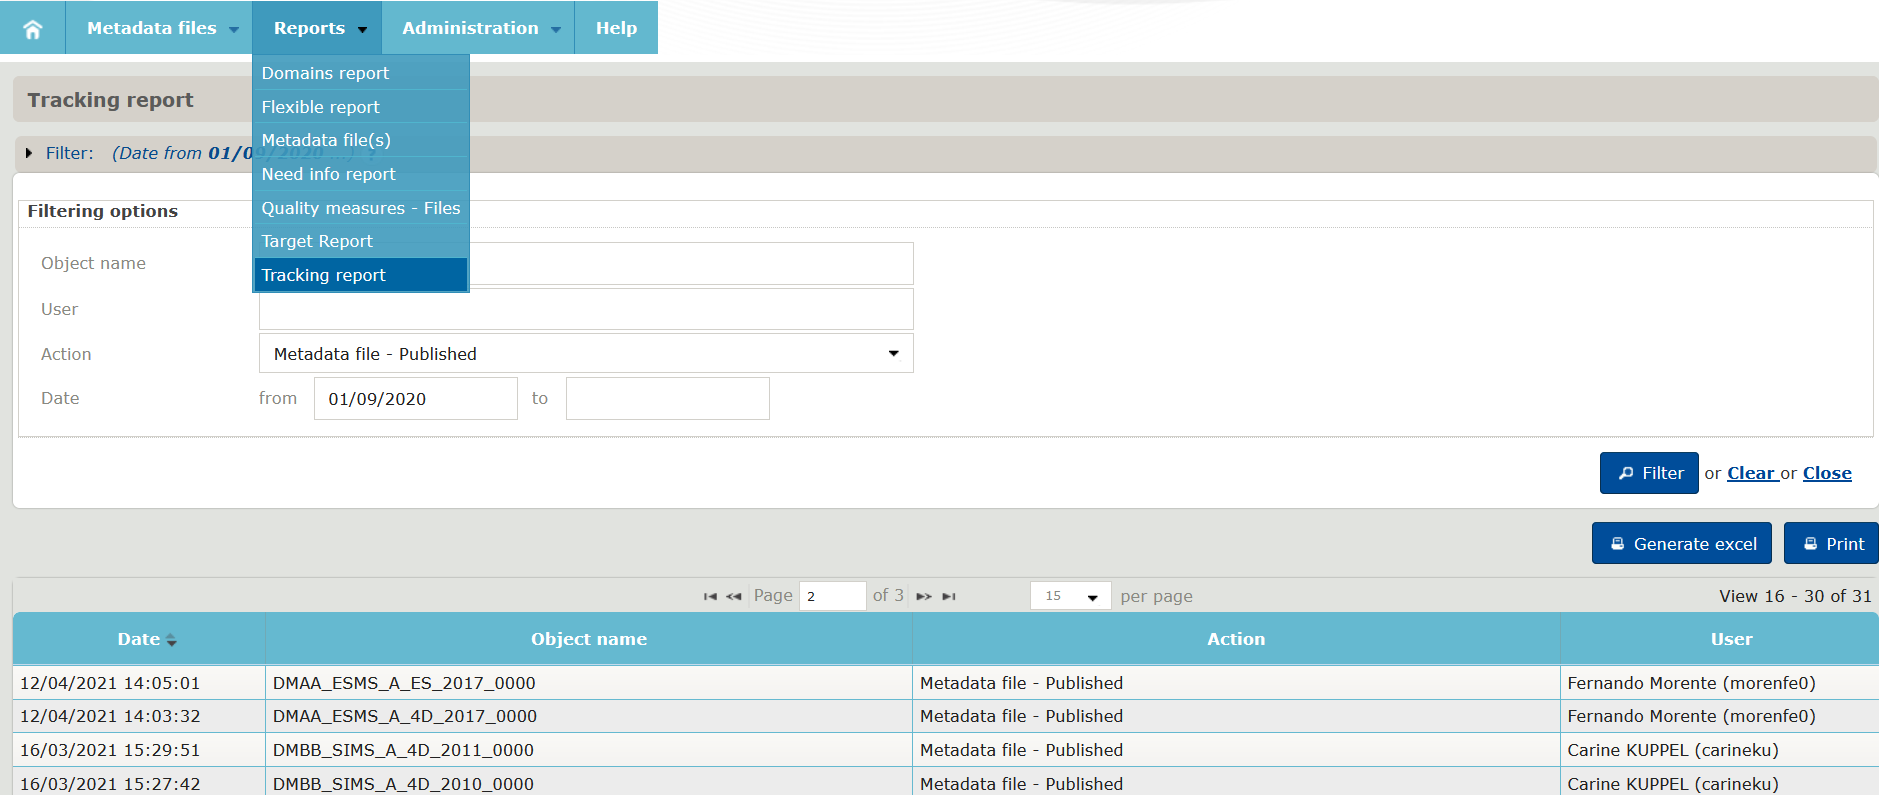
Figure 25: Published files
6. Specificities regarding roles
6.1 Super provider, Validator and Publisher
Super providers, Validators (Domain managers and Domain Co-responsibles) and Publishers can manage users of ESS-MH.
Super providers are responsible for the management of their members. In other words, they are able to see all members across their country as well as add new ones. Validators can see members across all countries in their respective domain and can manage them, that is accept or refuse access requests, if the Super provider of the respective country for their domain does not forbid it.
Please note that the user management, that is adding new users and granting, accepting or refusing rights requests, is handled in EDAMIS. Information on how user rights can be managed in EDAMIS can be found at How to manage rights and How to create, delete and update users.
6.2 Super providers
In order to support ESS users to correctly report national metadata and quality information, Validators can develop tailor made instructions and make them available on the ESS MH. These instructions will be displayed upon selecting ![]() icon, located at the concept/sub concept level and next to the metadata file name. Unlike definitions which are domain independent and derived from the SDMX Glossary, this additional information may be domain and collection specific, if needed.
icon, located at the concept/sub concept level and next to the metadata file name. Unlike definitions which are domain independent and derived from the SDMX Glossary, this additional information may be domain and collection specific, if needed.
Super Provider can access these by selecting Guidelines on the Administration tab. Depending on the specific case, guidelines can be downloaded or previewed in a simple HTML.
6.3 Validators
6.3.1 Guidelines
In order to support Super / Providers to correctly report national metadata and quality information, Validators can develop tailor made instructions and make them available on the ESS MH. These instructions will be displayed upon selecting ![]() icon, located at the concept/sub concept level and next to the metadata file name. Unlike definitions which are domain independent and derived from the SDMX Glossary, this additional information may be domain and collection specific, if needed.
icon, located at the concept/sub concept level and next to the metadata file name. Unlike definitions which are domain independent and derived from the SDMX Glossary, this additional information may be domain and collection specific, if needed.
Validators can access this functionality by selecting Guidelines on the Administration tab. Depending on the specific case, guidelines can be created, updated or imported. If new ones are to be drafted , the Add button will be selected.

Figure 27: Guidelines
A number of items will have to be defined for the new guidelines to be accessible on the right metadata collection. Thus, identifying the correct Typology, Metadata flow and Start & End year will ensure that the additional information is available at the right placed and complete the selection process.
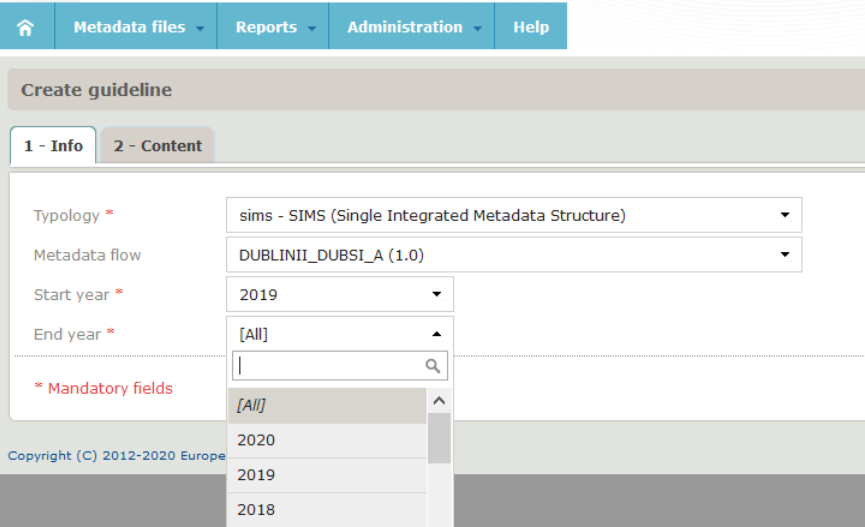
Figure 28: Guidelines definition
The supporting information will be inserted at the concept / sub concept level in the corresponding text box (similar to when reporting metadata / quality information).
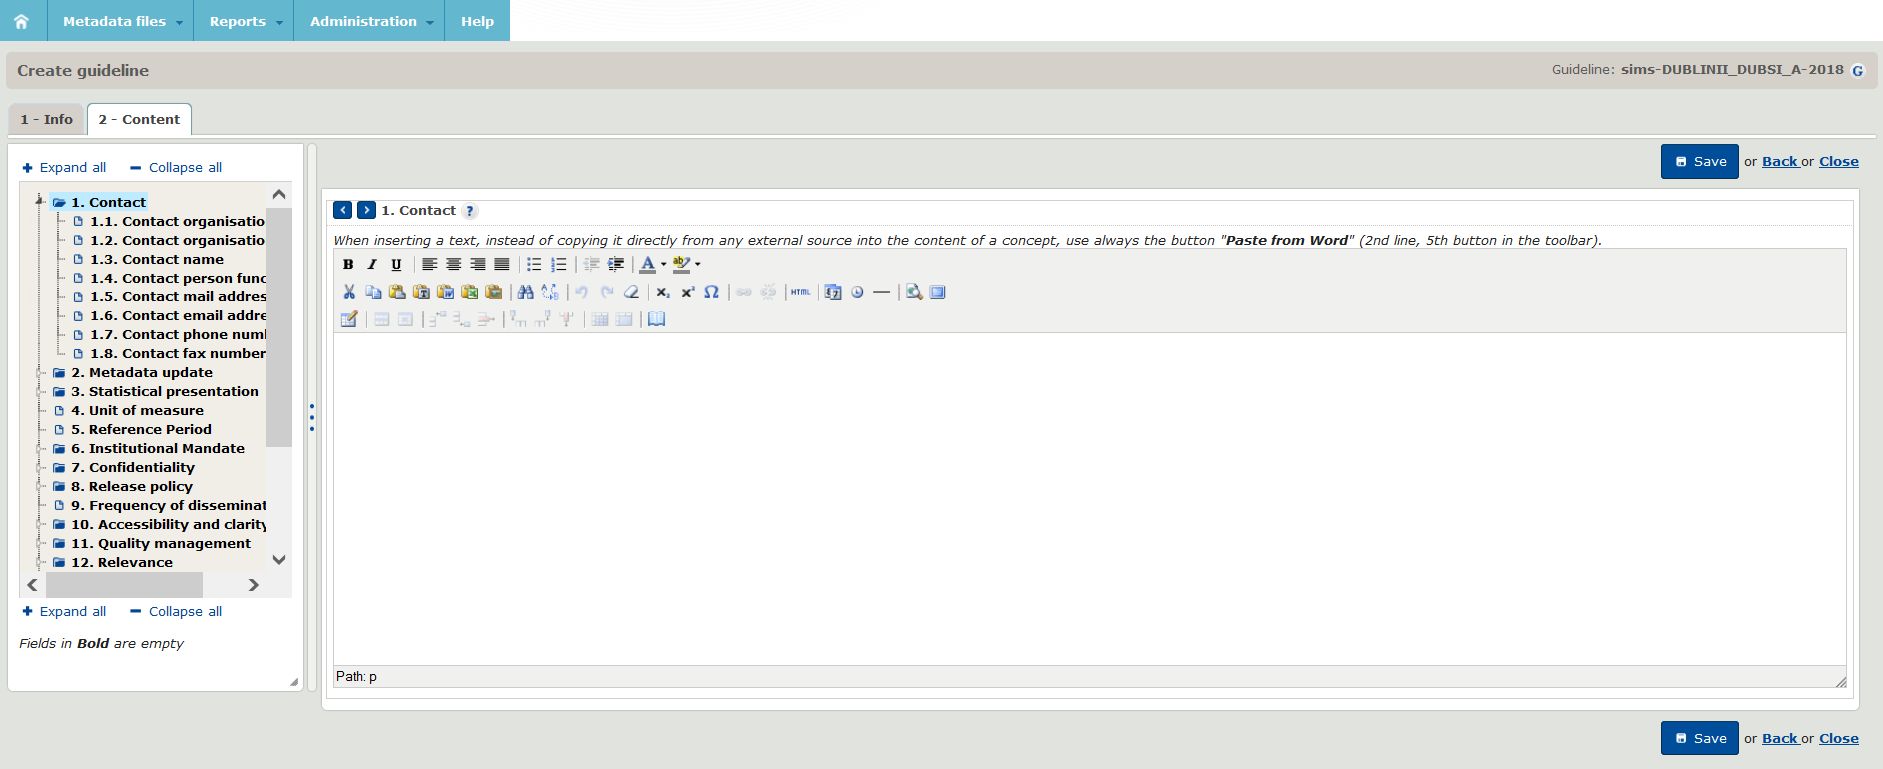
Figure 29: Guidelines - drafting
Once the Validator has completed the work s/he will click Save. The resulting guidelines will then become available together with the concept ID and definition for all providers who access the appropriate Typology, Metadata flow and for the specific year/s.
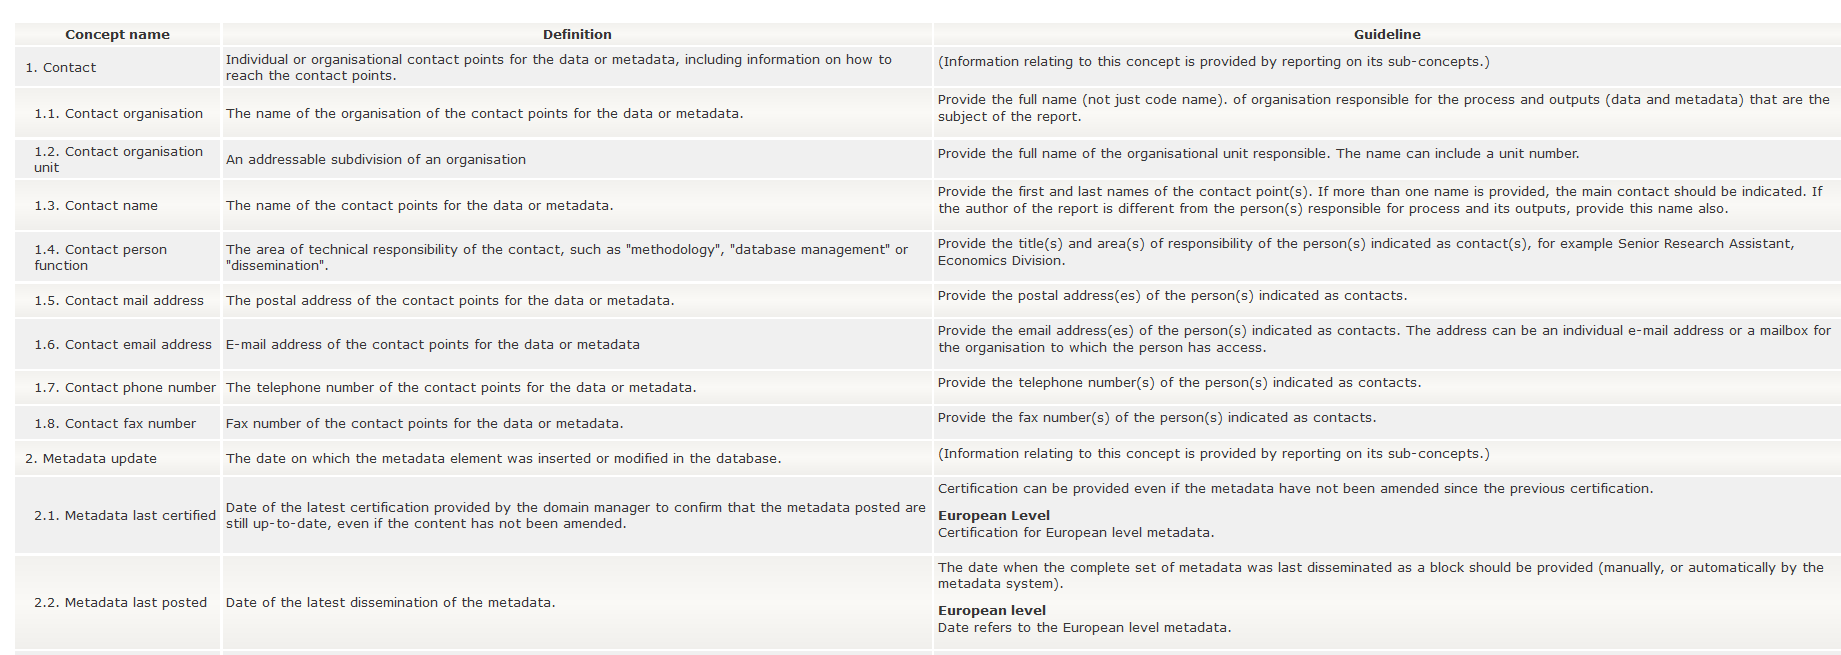
Figure 30: Guidelines - availability
6.3.2 Published files - broken links
In order to ensure the quality of metadata information that is disseminated, Validators can view in one screen all the published files which contain at least a broken link and correct them, whenever necessary. The “Published files - broken links” feature which is available under the “Reports“ tab, can be filtered by the following items:
- Domain
- Metadata flow
- Country
- Organisation - Provider
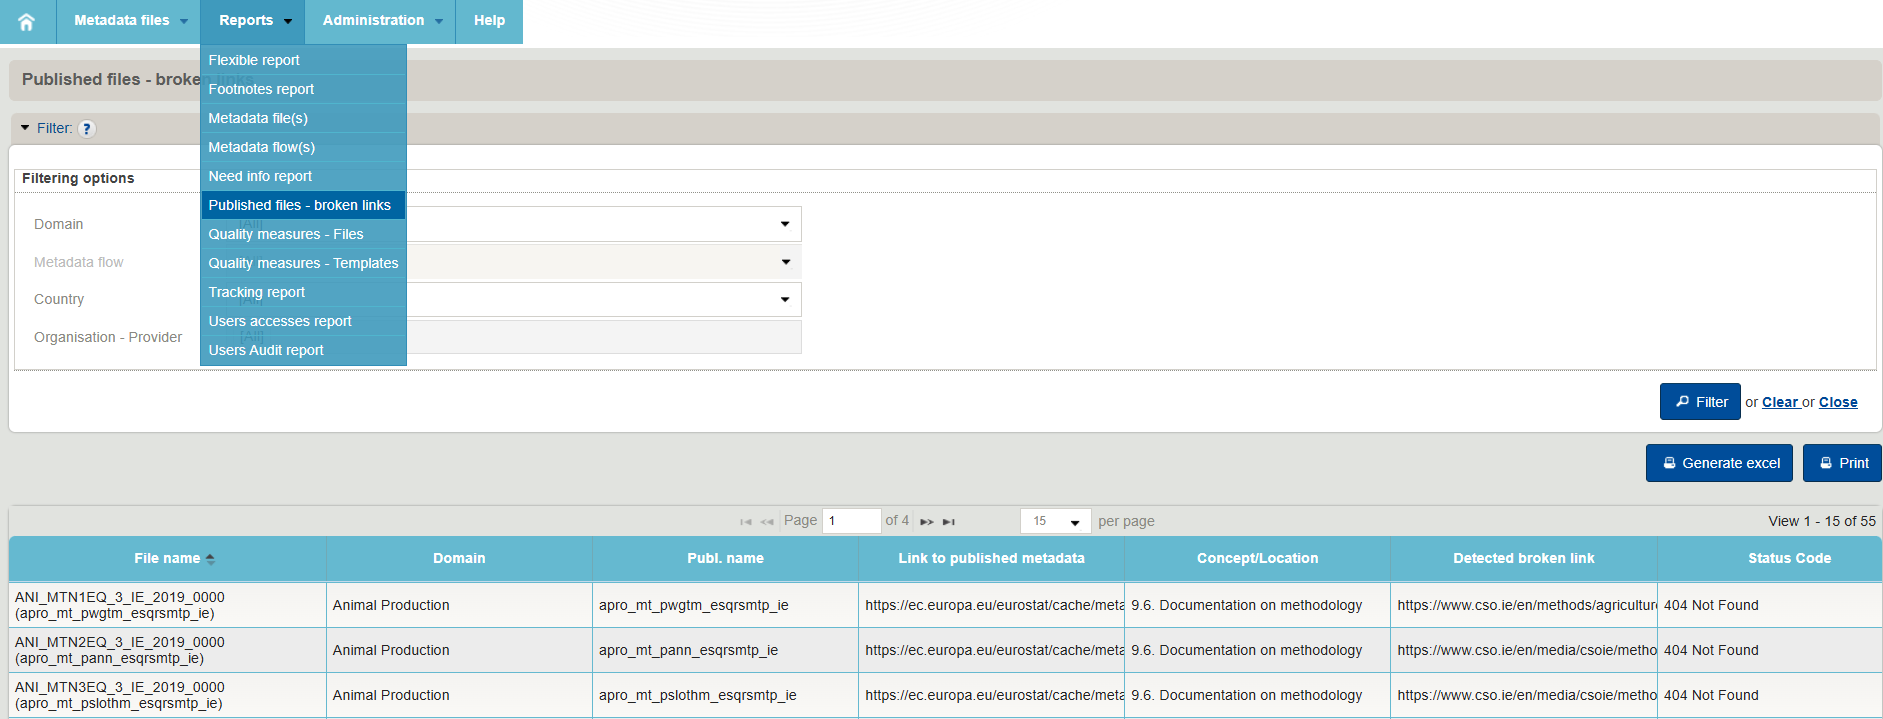
Figure 31: Published files - broken links
The outcome of the above selection can be downloaded in an MS Excel file by selecting ![]()
6.3.3 Tracking report
This functionality extends the possibility to group information to those available on the filter. In addition to selecting metadata files by status (draft, ready for validation, validated, ect) the tracking report enables to search for a large number of actions such as Need info before publication or validation and to other products i.e. guidelines and templates.
In order to use the Tracking report, Validators may fill in some or all of the following items:
- Object name: Indicate the name of the metadata, guidelines or template;
- User: Insert the name and uid of the user;
- Action: Select one of the available options ('All' is all included);
- Date: Identify the timeline of the search.
The outcome of the above selection can be downloaded in a excel sheet by selecting 
Figure 32: Tracking report
6.4 Super providers, Validators and Publishers
6.4.1 Users' list
All the three roles are able to access the full list of members to a specific domain and metadataflow. The list of users by domain and metadataflow can be retrieved on the Reports tab / Users accesses report and after filling in the required information
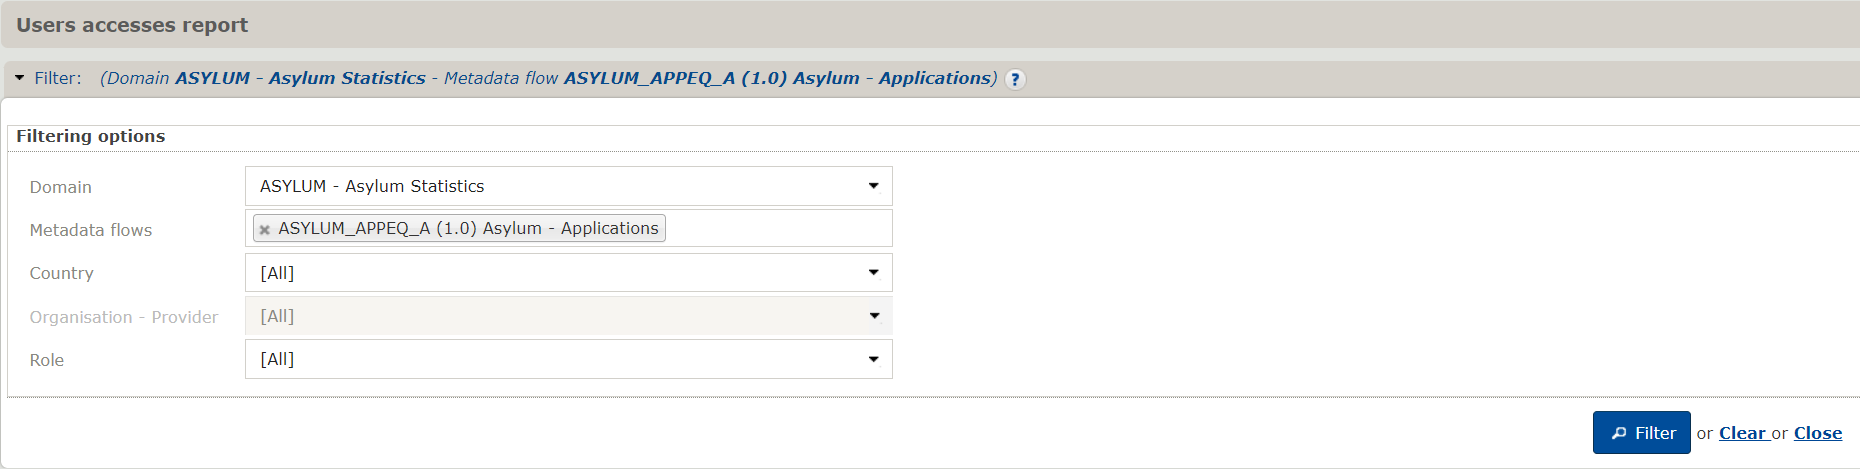
Figure 33: Users' list for a particular domain
A Metadataflow describes and constrains the allowable content of a metadata set that metadata providers will supply for different reference periods. The Metadata Flow(s) report allow to view the specificities of all the metadataflows that Super Providers, Validators or Publishers have access to, including:
- Status: Whether the metadataflow is currently opened (active) or not (deactivated);
- MSD: The Metadata Structure Definition that is referenced by the metadataflow;
- Providing Organisations: Full list of organisations expected to provide metadata reports;
- Pub: Whether the metadata reports will be published
- Publication targets: If so, where will they be published; and
- Node: Identifying the location on Eurobase.
In order to navigate through the Metadata Flow(s) list, users can filter on Domain, Country and Organisation – Provider and Status.
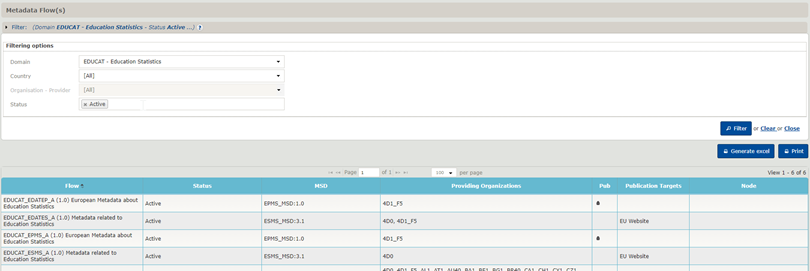
Figure 34: Metadata Flow(s) report
[1] The ESS-MH application includes four other roles which are not covered by this user guide: Super Administrator, Administrator and Super Viewer and Viewer.
[2] That is true for the Eurostat and for ESS users although the number of actions depends on the user type.
[3] If not redirected automatically, the user will have to access the app manually by accessing the app URL.
[4] If data to be entered is that of date type a calendar will become available to help the user choose the specific date. If the selection of a codelist is required, the list of available codelists will be shown.
[5] Or the Eurostat user if it is a European metadata file.
[6] The legend is located at the bottom of the navigation tree.
[7] The Need info option is available when the file cannot be published as it is and requires further work from the Validator.