ESS metadata handler user guide
For service support, please contact: |
| Last reviewed : 24-10-2025 |
| ESSMH web portal |
1. Introduction
The purpose of this document is to provide a short but complete overview of the ESS-MH web application from a user perspective.
Users are authenticated by their username and password (EU Login). Based on this personal information as well as domain/s of interest/s and duties, authorisation takes place and a role is assigned. There are multiple roles defined in the ESS-MH application[1]:
- Publisher (Eurostat): the user has full access to all domains for all metadata providers.
- Validator (Eurostat): the user has full access to metadata flows belonging to his/her designated statistical domain.
- Super provider (ESS): the user has access to all domains and metadata flows across the different institutions placed in his/her country. In other words, access is country-based and not institution-based.
- Provider (ESS): the user is an end-user of an NSI (or any other national metadata provider), and has access to the metadata flow/s pertaining to his/her specific domain.
Further information on how to request access to ESS-MH can be found at Access requests.
Metadata files’ workflow
The web application follows the rationale shown in Figure 1, covering all the steps included in the life-cycle of a reference metadata file. The process begins with the collection of metadata information which can be done in various ways such as creating a new file, importing an external final into the system as well as copying or updating an existing file. The status of such file will be Draft and together with Ready for Validation and Ready for Publication they represent all intermediary stages. The Validated status will be the end point for metadata files which are not to be disseminated. Otherwise, it will be another intermediary stage before a file reaches Published status.
Metadata files can also navigate backwards upon the request of the user [2]. Super / Providers can send back to Draft status any metadata file that they have access, independent of its current status. Validators can also perform this action but have the possibility to send it to Ready for Validation in addition to Draft status.
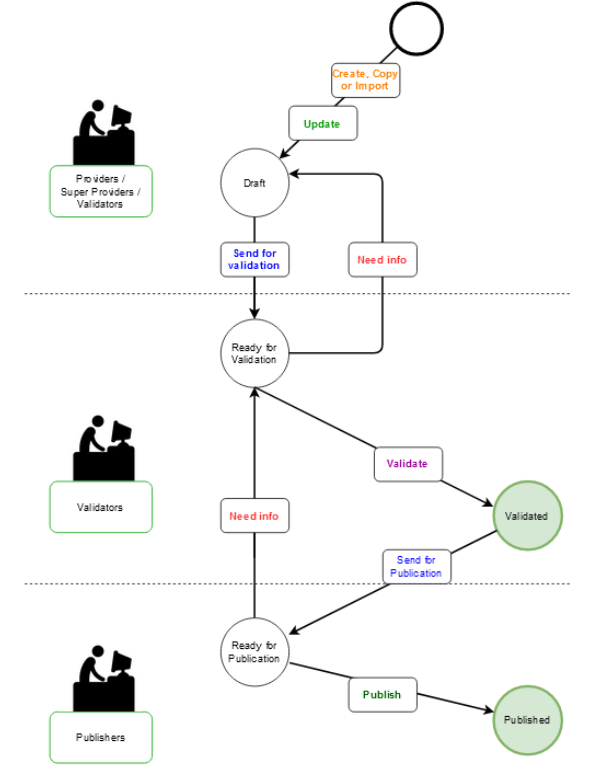
Figure 1: Metadata file’s workflow
2. Login

Figure 2: Login page
ESS MH users can access the web based tool by clicking on the Login button. Users will automatically be directed to the EU Login page in order to identify themselves. Please note that you will have to provide your email address and password. Other actions such as Create an account are available too.
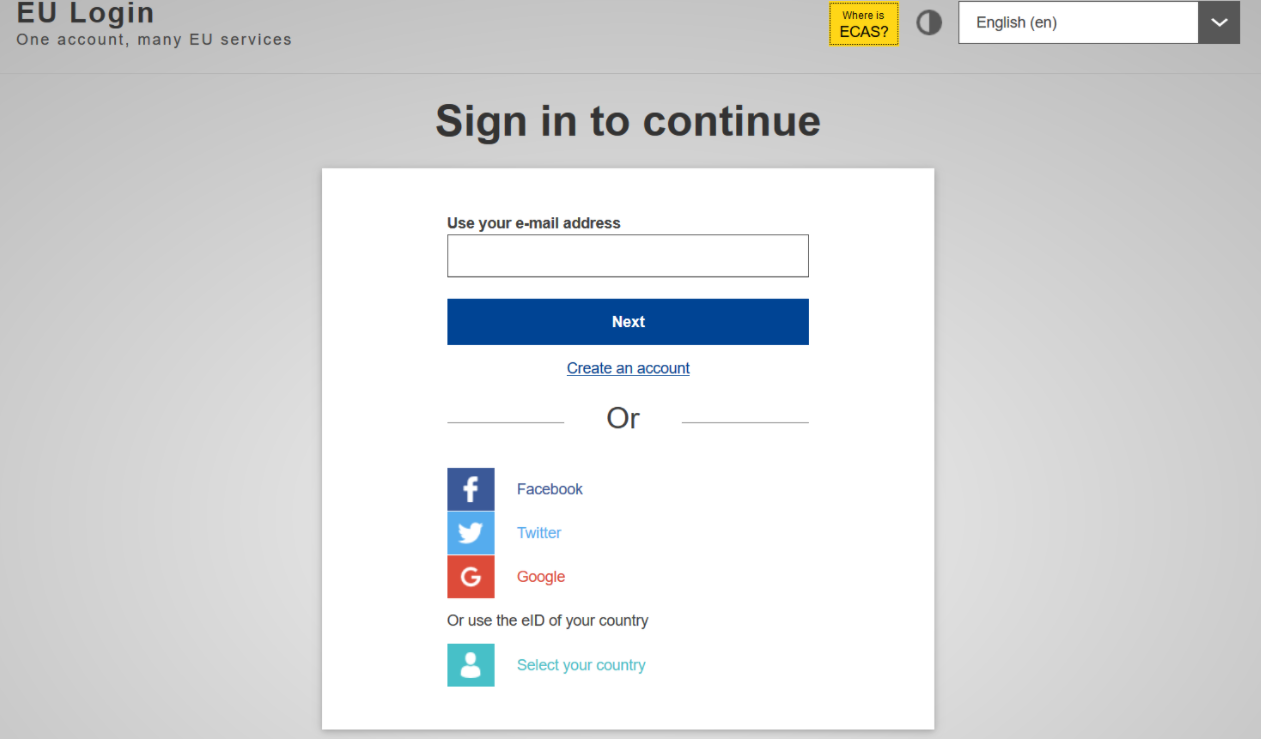
Figure 3: EU login page
Upon successfully logging in to the web application, the user will be redirected to the home page of the IT application[3].
3. Create a reference metadata file - New
The user can create a file by either clicking the Add button or selecting New, located on the drop-down menu of the Metadata files’ tab. Please note that other options such as Copy or Import an existing metadata files may be used in order to initiate the workflow.
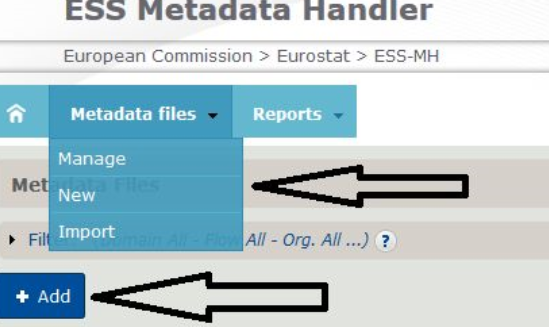
Figure 4: New / Add metadata file
3.1 Step 1 — Info
The first page of the wizard is displayed. The user will have to fill in the information as required bearing in mind that those categories marked with a red asterisk are mandatory. Once the information is completed the user should click Next.
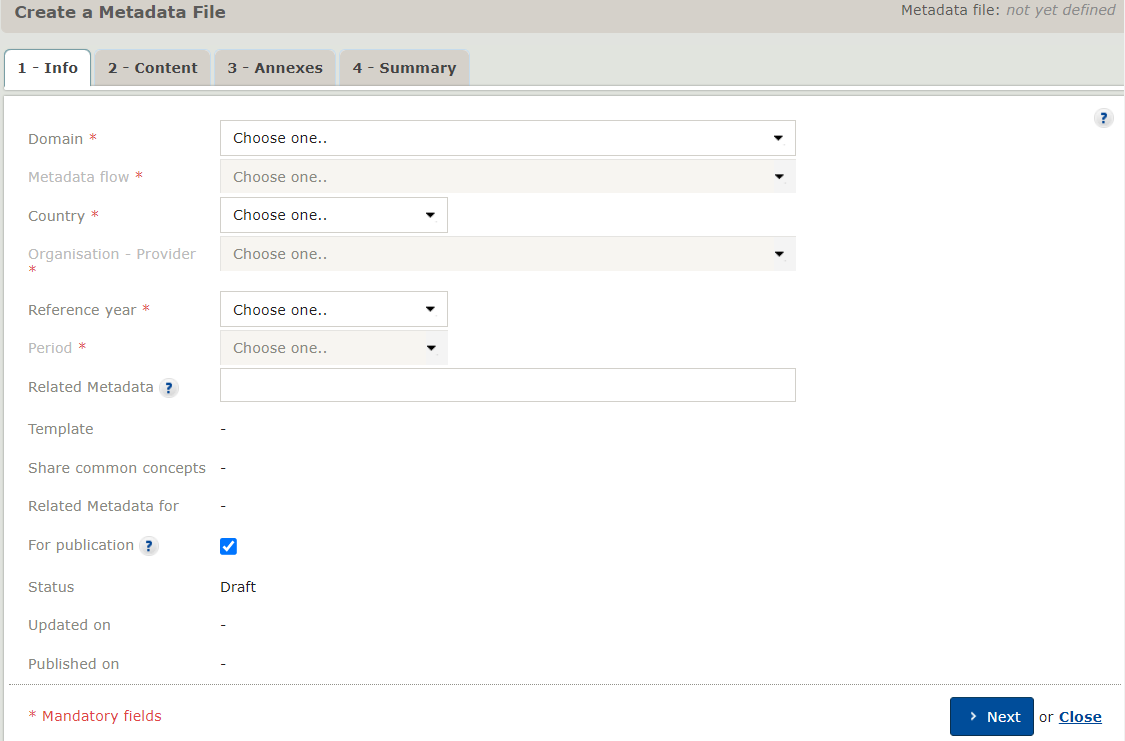
Figure 5: Creating a metadata file – Info
The user can return to Step 1 of the wizard by pressing the Back button or by selecting tab Info. If the Close button is pushed without saving the information, the information inserted until then will be lost and the user will be redirected to the homepage.
3.2 Step 2 — Content
In Step 2 of the wizard, the Metadata file name will automatically be generated based on the information provided in the previous step.
The user must also fill in all the mandatory fields needed to complete the metadata file. Mandatory fields are marked with a red asterisk in the tree structure. Different functionalities are available such as the Expand all button, which enlarges the (sub) concept’s list.

Figure 6: Creating a metadata File – Content I
Each (sub) concept is linked to a harmonised definition which may be complemented by some additional information (guideline). (Sub) concepts' definitions and guidelines can be accessed ![]() icon. Once an editable (sub) concept is selected by the user from the tree structure, there are two ways to enter data in the text-box[4]:
icon. Once an editable (sub) concept is selected by the user from the tree structure, there are two ways to enter data in the text-box[4]:
- Enter data directly in the text box (not copied from another application).
- Paste text from another application such as MS Word (Ctrl+V)
In order to ensure accuracy, clarity, completeness, and accessibility, ultimately improving the content of the metadata files we recommend the use of the quality checklist and the accessibility guidelines ![]() . By diligently following the checklist and guidelines during the pre-publication phase, users can identify and rectify errors, resulting in reliable and easily understandable information for end-users. The comprehensive checklist covers aspects like quality measures, layout, comprehensibility, completeness, clarity, language, images, and accessibility, guaranteeing that metadata files meet necessary standards for publication.
. By diligently following the checklist and guidelines during the pre-publication phase, users can identify and rectify errors, resulting in reliable and easily understandable information for end-users. The comprehensive checklist covers aspects like quality measures, layout, comprehensibility, completeness, clarity, language, images, and accessibility, guaranteeing that metadata files meet necessary standards for publication.
The Spell Checker ![]() button will help you identify words which may not be spelled correctly in English. For this feature to work, please make sure to enable English as the preferred language for spell check in your browser (e.g. In Google Chrome, please go to chrome://settings/languages).
button will help you identify words which may not be spelled correctly in English. For this feature to work, please make sure to enable English as the preferred language for spell check in your browser (e.g. In Google Chrome, please go to chrome://settings/languages).
The user can reuse the content of some or all concepts from existing metadata file/s by pressing the Reuse button. This action will trigger a pop-up window with a full list of all metadata files that the user has access to. A Filter option is available to help the user locate the appropriate information. After selecting the corresponding file/s the user will go on a second step and identify the (sub) concept/s which contain the information that will be reused. The process will only be completed after clicking Apply. For more information on this feature please go to the Reuse FAQ.
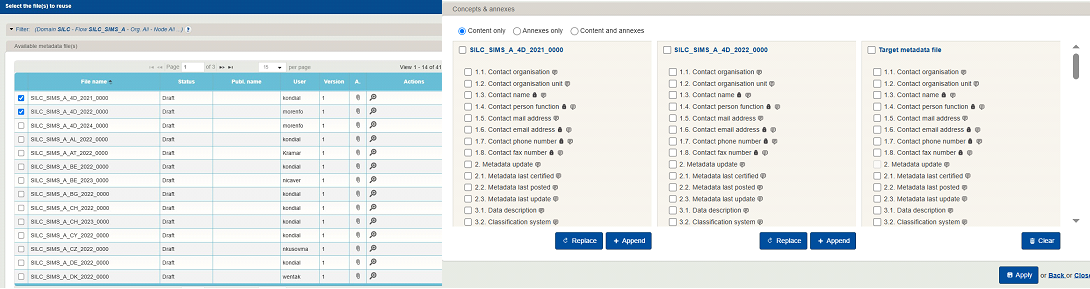
Figures 7: Steps 1 & 2 of the Reuse functionality
Users can decide whether an editable (sub) concept is publishable by ticking (or not) the appropriate box (restricted for publication). Additionally, Annexes can also be added to the new metadata file at the (sub) concept level by using the 'add file' and/or the 'add URL' button, depending on the format of the Annex. If the information to be attached is not related to one (sub)concept but to the whole new metadata file please proceed to the next tab of the wizard (step 3).
Finally, if the user does not fill in all the mandatory fields and tries to proceed to Summary (step 4), an error message is displayed indicating all the mandatory field(s) that still need(s) to be completed.
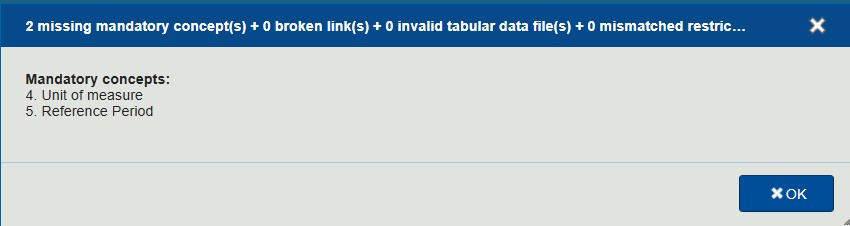
Figure 8: Missing mandatory information
3.3 Step 3 — Annexes
Annexes can be added to a metadata file on step 3 of the wizard. They can be uploaded to the system as a regular file and/or using a link to specific location by means of an URL address which will be placed at the bottom of the metadata file. The Annexes will be accompanied by a prefilled «Name suffix» based on the description provided.
Annexes can be sorted in ascending or descending mode, restricted for publication if needed (by selecting the 'Restr.' box) and changing the order by dragging and dropping them.

Figure 9: Creating a metadata file - Annexes
3.4 Step 4 — Summary
This is the last step of the wizard and so for the creation of the new metadata file. The user sees all the information that was filled in, under the sub-tab Full view. The information remains the same (except for five sub concepts comprised in Contact which are never published) under the Disseminated view sub-tab as long as the user has not activated the Restricted for publication functionality for any of the (sub) concepts (please see step 2). Otherwise, the locked (sub) concept(s) would be published replacing the content with a standard text (Restricted from publication).
The user will be able to view the information as it will appear once published. The Short metadata contains a subset of 15 concepts providing an enriching summary of the available metadata information. The user will also have the possibility to access all available metadata information by selecting the Full metadata option.
The user can also activate the lock for the entire new metadata file by not ticking the box For publication (please see Figure 10). In other words, this box has to be ticked in order to be eligible for publishing at a later stage.

Figure 10: Creating a metadata file -Summary
If the user attempts to close the wizard at any of the four steps without saving the file, a pop-up windows will alert him/her. If the action is pursued and the file is deleted, the information inserted up to this point will be erased from the system.
Finally, the user will save the newly created metadata file by pressing the Save button at the top and/or bottom of the page. The file is saved as Draft. Only when all the required information have been inserted and saved the Send button (for validation) will become available.

Figure 11: Sending a metadata file for validation
If the action was successfully completed the status of the metadata file would change from Draft to Ready for validation. Please note that an automatic notification will be triggered from EDAMIS4 regarding the transmission of the metadata file. More information about EDAMIS4 notifications alerts can be found at this FAQ.
In order to ensure the correct display of metadata information the Quality measures button is available. This functionality provides important information to metadata producers in relation to the formatting of information that was introduced up to this point. It should be noted that if invalid (not printable) characters are included which may affect the display of information, this will be reflected in the message generated from the Quality measures. If the file does not contain any unwanted tags, the inserted metadata information should then be visible exactly the same by all parties regardless of the browser & other IT aspects that are involved.

Figure 12: Quality measures box
[1] The ESS-MH application includes four other roles which are not covered by this user guide: Super Administrator, Administrator and Super Viewer and Viewer.
[2] That is true for the Eurostat and for ESS users although the number of actions depends on the user type.
[3] If not redirected automatically, the user will have to access the app manually by accessing the app URL.
[4] If data to be entered is that of date type a calendar will become available to help the user choose the specific date. If the selection of a codelist is required, the list of available codelists will be shown.